Defining and allocating vCloud Director resources
For IT shops configuring VMware vCloud Director, here are the first four steps needed to make the service aware of a vSphere environment.
In part one of this series, we completed the initial setup of VMware vCloud Director. The next stage involves defining the physical resources available to vCloud Director and allocating them to the business units.
As you might recall, there are eight steps to VMware vCloud Director configuration. In the first four steps, which we will cover here, you will make vCloud Director aware of the vSphere environment. You will also create what VMware calls the Provider Virtual Data Center (vDC). It's called this because it provides resources (CPU, Memory, Disk and Network) to vCloud Director. This is how the service takes your physical ESX hosts and presents them to cloud consumers without having to worry about "plumbing" aspects like clusters and resource pools.
It's possible to configure many Provider vDCs and have each offer up different qualities of service, both from a performance and availability perspective. In a large environment, you might end up with a few partitioned Provider vDCs that can offer gold, silver and bronze classes of service. Within each Organization vDC, there is an option to create new vApps in different classes of Provider vDCs.
In this tip, you will create one Provider vDC and one Organization vDC; afterwards, you can repeat this process to add different classes of each. Once you complete the setup, you will see the available options changing from "Create a Provider vDC" to "Create another Provider vDC":

Figure 1: Creating virtual data centers (Click to enlarge)
It is possible to add multiple vCenters in Step 1 and multiple Provider VDCs in Step 2 that are associated with either of the vCenter servers. But to prevent repetition, I won't document that process in its entirety.
Step 1: Attach a vCenter
The first step in provisioning your cloud resources is making the vCloud Director host aware of your vCenter environment. Click "Attach a vCenter" and complete the fields as befits your environment. In my case, I have used the built-in administrator account. I would recommend creating a specific user account for this role, much as you would when implementing virtual machine (VM) backup software or configuring VMware View.
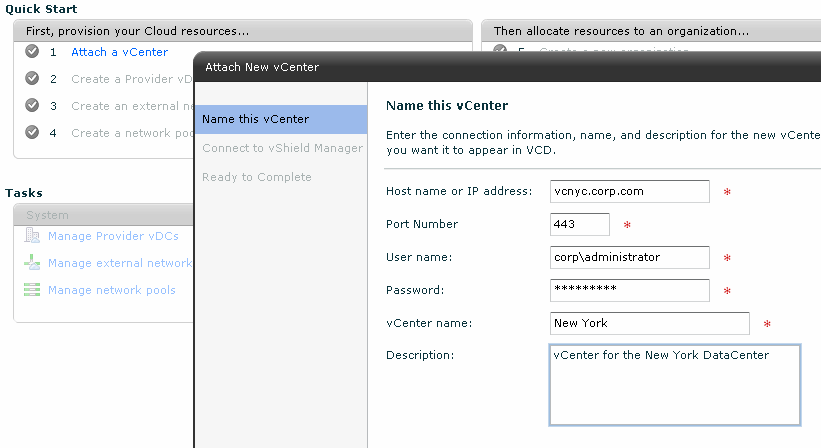
Figure 2: How to attach a vCenter (Click to enlarge)
Click "Next" and you will be prompted for the hostname or IP address of the vShield's appliance, along with the appliance's username and password. Unless you have changed the default credentials, this is "admin" for the username and "default" for the password.
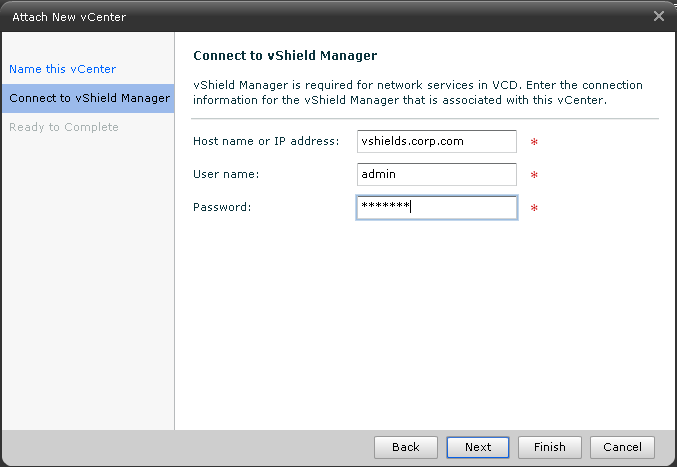
Figure 3: Linking to vShield (Click to enlarge)
Click "Next" and "Finish" and you will trigger the process of vCloud Director attaching to vCenter.
Step 2: Create a Provider vDC
The next step is to create your first Provider vDC. In my case, I created resource pools that reflected each of the classes I would need. The reality is that you have a great deal of flexibility in deciding at how to "partition" resources when creating Provider vDCs. As a best practice, VMware recommends you select a vCenter Cluster as the root resource pool of the Provider vDC. That way, the end user would be able to use the resources of all the ESX hosts contained within.
If I had enough resources and ESX hosts, I would have my Provider vDC backed by clusters rather than resource pools. One limitation with vCloud Director is that you can currently only add one cluster to a Provider vDC. But this does introduce a scalability limit around the current technology; thus the recommendation to use a resource pool as a way to maximize the scale of the vDC.
We will likely see the number of hosts per cluster increase from the current number of 32, but at the moment there's no way to scale a Provider vDC across multiple resource pools. That essentially makes the Provider vDC limited to the resources of a cluster, but the ability to aggregate resources across clusters should arise in the near future.
You will also need to select what storage will be available to the end users using this vDC. At the end of the process, input the root account and password for the ESX hosts that service the resource pool. This allows vCloud Director to install its management agent into the ESX(i) host. If you have the same root password for all the hosts, you can provide the credentials globally. Start by giving your Provider vDC a friendly name and description:

Figure 4: Name the vDC (Click to enlarge)
Then select the resource pool or cluster that will back the vDC:
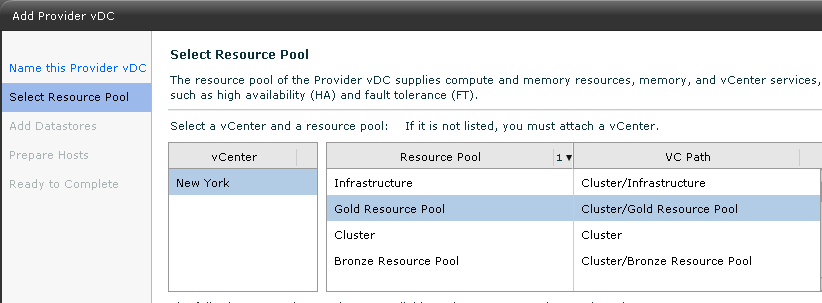
Figure 5: Choosing a resource pool (Click to enlarge)
Author's note: In this example, I used resource pools as my method of allocating resources to Provider vDCs. In an ideal world, I would prefer three clusters that offer different qualities and quantities of RAM/CPU and storage. Due to a lack of ESX(i) hosts in my lab environment, however, this was unachievable. By allocating resources at this cluster level, you offer different features. A "bronze" level cluster, for example, might not have VMware HA available.
The next step is to add vSphere4 data stores to the Provider vDC. If you are creating a "gold" vDC, make sure your storage option offers the best combination of performance and availability. Select the data stores that possess these attributes and use the "Add" button to include in the vDC. In my case, I have a couple of small NFS volumes set up for demonstration purposes; the "gold" NFS volume supports RAID 10 and the "bronze" volume offers RAID 0.

Figure 6: Adding a data store (Click to enlarge)
Finally, supply the root password for your ESX(i) host. This will permit vCloud Director to install its management agent, along with allowing "remote console" windows to open up on VMs using the Console Proxy network interface set during installation.
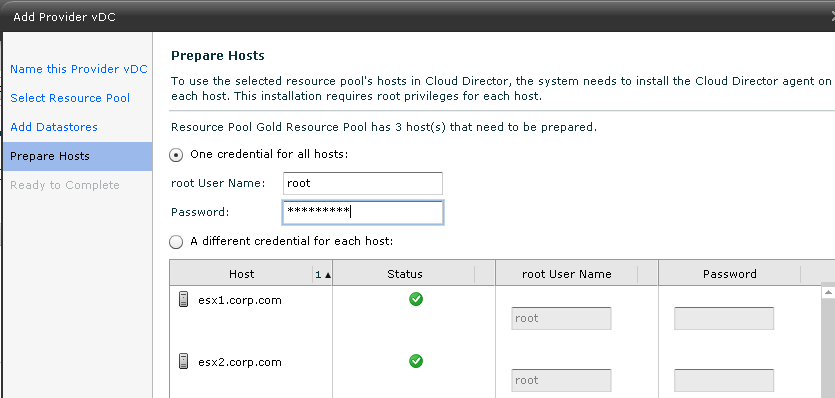
Figure 7: Prep the hosts (Click to enlarge)
At this stage, I clicked "Create another Provider vDC" and generated a silver and bronze vDC. You can monitor and modify these vDCs from the vCloud Director home page:
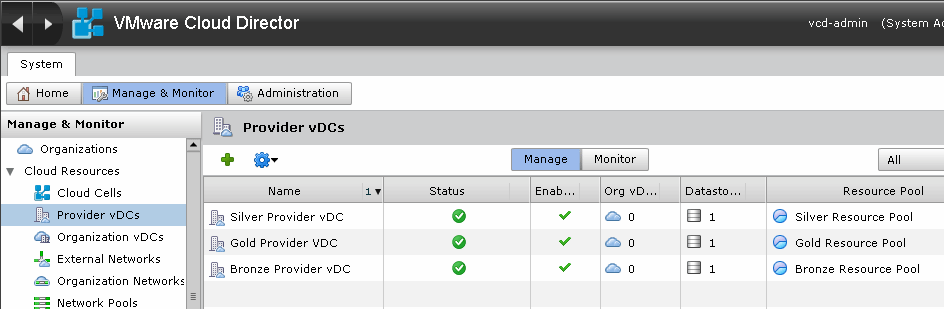
Figure 8: Monitor your vDCs (Click to enlarge)
Step 3: Create an external network
vCloud Director needs to be informed as to how connections are made from the cloud to the outside world. This could be through either a direct connection to the Internet or a VPN connection. Some care needs to be taken when you create port groups on a vNetwork Distributed Switch, and attention needs to be paid to the "port binding" settings. These appear on the properties of each port group:
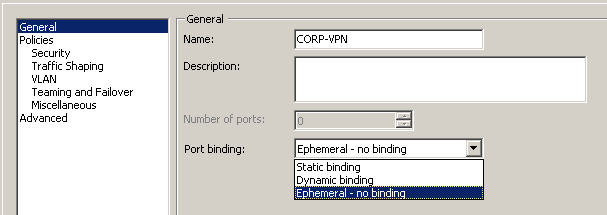
Figure 9: Set up your ports (Click to enlarge)
By default, a new port group uses the "static binding" value. These settings can and will change the way VMs grab their network connections. When a VM powers on, it grabs a port from the allocation and never hands it back to the "pool," even if it's powered off. With "dynamic binding," VMs grab a port from the vNetwork Distributed Switch but also hands it back.
But if you create and power up more VMs than there are ports (the default is 128), the 129th VM will not power on. So anyone using dynamic binding needs to increase the number of ports on the port group in line with your scale.
You might initially think a way out of this issue would be to use the "ephemeral" setting on a port group. Ports through the "ephemeral – no binding" option are created dynamically as VMs are powered on, and you are only limited by the configuration maximums within vSphere 4. For this reason, you cannot set the number of ports available once you have selected the "ephemeral" option. However, currently the number of available ephemeral ports in vSphere 4.1 is less than the number of dynamic ports.
Of course the end user of the Organization vDC has no awareness of these parameters. The danger is that, if you use either "static" or "dynamic," the end user could quite easily exceed the available number of ports. When you run through the "external network" configuration, vCloud Director will warn you if you port groups have these binding settings.

Figure 10: Port-themed warnings (Click to enlarge)
I usually create an external network for each of my organizations; each will have a bundle of IP addresses valid for external access to a VPN. It's worth stating that if you are worried about running out of ports, you should be equally concerned about exhausting this pool of available IP addresses.
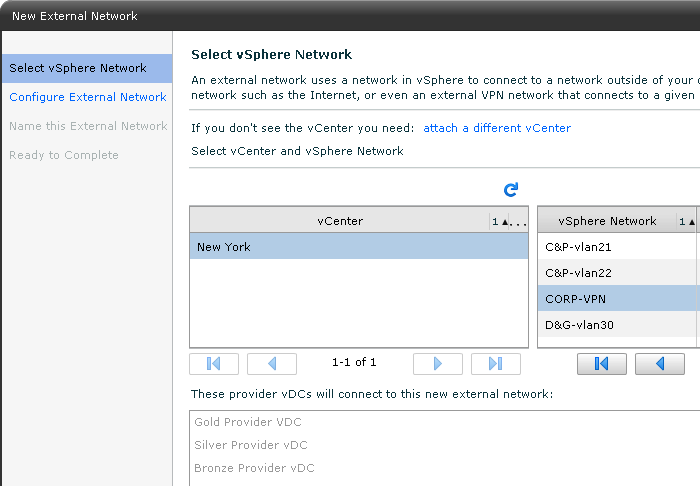
Figure 11: Select a vSphere network (Click to enlarge)
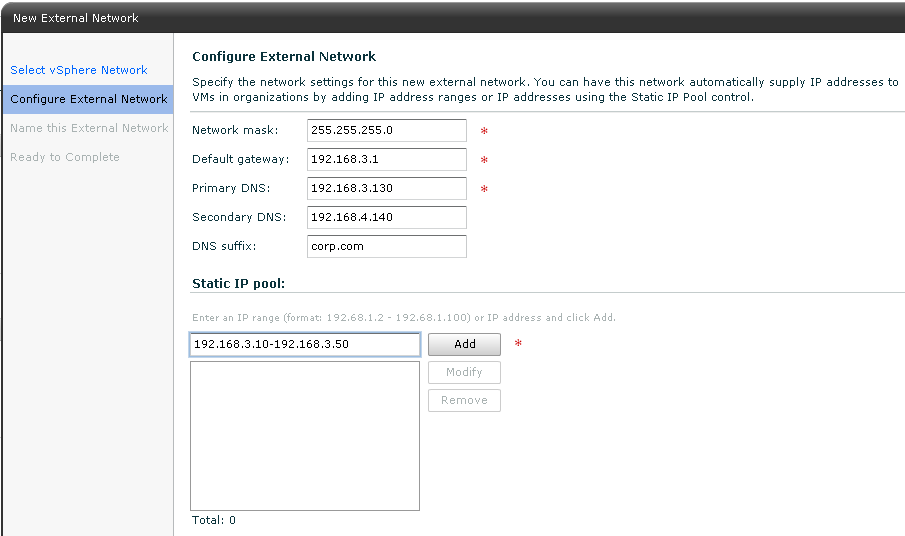
Figure 12: Configure an external network (Click to enlarge)
Step 4: Create a network pool
A network pool is a collection of networking resources that will be consumed by an Organization vDC to create organization and vApp networks. There are three different options for creating network pools. These include:
• VLAN-backed
• VCD network isolation-backed
• vSphere port group-backed
I've listed each of these options as they appear in the vCloud Director wizard:
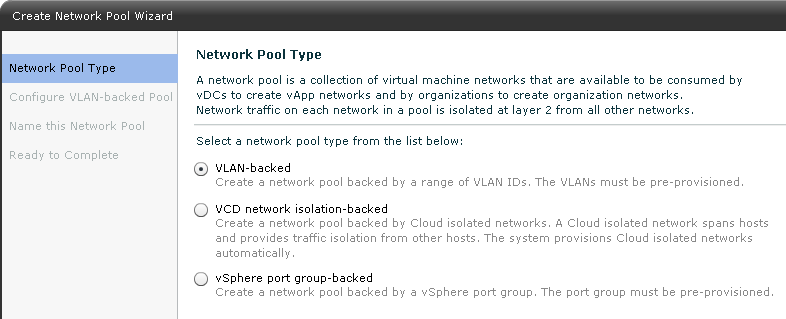
Figure 13: The various network pool types (Click to enlarge)
The VLAN-backed approach requires a vNetwork Distributed Switch and a range of VLAN tags. The VLAN IDs are managed as a pool, and vCloud Director assigns them to port groups as organization and vApp networks are created. The VLANs are returned to the pool when the networks are no longer in use, such as when a vApp with a vApp network is powered off. The downside is that this approach requires not just availability of VLAN IDs but also the aforementioned vNetwork Distributed Switch.
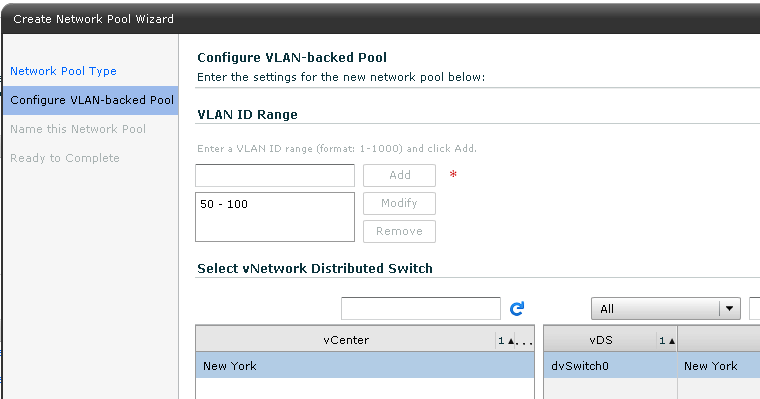
Figure 14: The VLAN-backed pool (Click to enlarge)
In this particular VLAN-backed network pool pictured above, I've allowed the Distributed Switch to create many VLAN IDs from the range of 50 to 100. Remember, these VLAN networks would need to be created on the physical switch for this to work. The advantage here is the VMware admins only have to access their network teams to create a range of VLAN, rather than having to wait for a new VLAN to be created each time it is needed. This way, you can see that the "pool" of VLANs can be used when needed and handed back to the pool once they are not.
The VCD network isolation-backed network pools use MAC-in-MAC encapsulation to create a Layer-2 network without the need of VLAN IDs. This method also requires a Distributed Switch; if you want your cloud life to be simple and easy, having access to a Distributed Switch is pretty much a necessity.
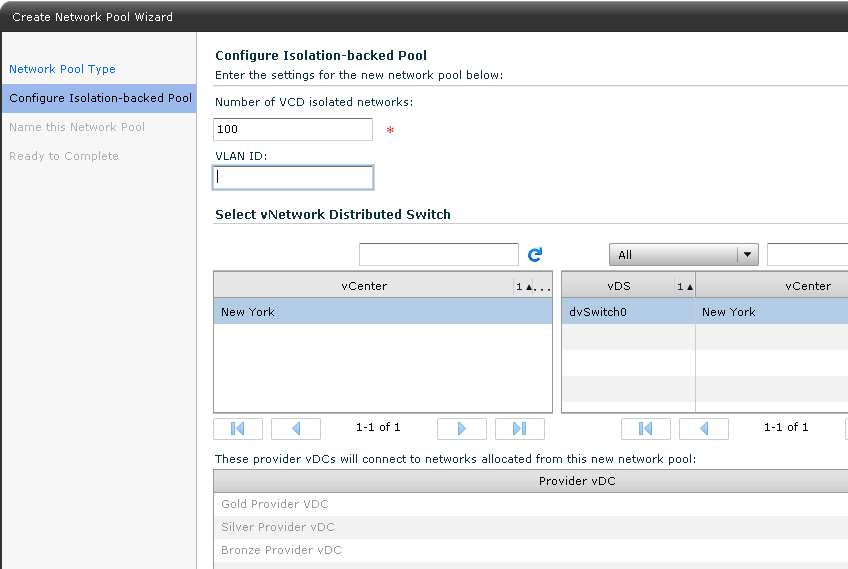
Figure 15: The isolation-backed pool (Click to enlarge)
Author's note: I requested 100 isolated networks using the MAC-in-MAC encapsulation method; each will be contained in a single non-routable VLAN.
Finally, the vSphere port group-backed network pools probably represent the most administratively intensive way of providing network resources to the Organization vDC. On the plus side, this approach is compatible with Standard and Distributed Switches, as well as the Cisco Nexus 1000V. The downside is the need to have these port groups created by the administrator before they can be consumed by vCloud tenants.
As such, this is probably the least dynamic of the three options. With that said, if your network environment uses a Cisco N1Kv or remains relatively static, you might find this suits your present needs. If a new network was required, however, a new port group would need to be created and the network pool would have to be updated. Using just the Standard Switch would require PowerCLI to automate this process across all the hosts in the cluster; once the script had been completed, the vCloud Director administrator would need to update the network pool definition for any organizations affected by the change.
In my scenario, I created networks and allocated them using the wizard. I then repeated this process for each of the business units and ended up with three network pools, which in turn contained three VLANs each.

Figure 16: The port group-backed pool (Click to enlarge)
This completes the more "physical" side of the post-configuration of vCloud Director. In the final part of this three-part series, we will cover the final four steps of vCloud Director configuration. These include how to create a new Organization vDC and how to allocate the partitioned resources.
ABOUT THE AUTHOR:

Mike Laverick (VCP) has been involved with the VMware community since 2003. Laverick is a VMware forum moderator and member of the London VMware User Group Steering Committee. Laverick is the owner and author of the virtualization website and blog RTFM Education, where he publishes free guides and utilities aimed at VMware ESX/VirtualCenter users, and has recently joined SearchVMware.com as an Editor at Large. In 2009, Laverick received the VMware vExpert award and helped found the Irish and Scottish VMware user groups. Laverick has had books published on VMware Virtual Infrastructure 3, VMware vSphere4 and VMware Site Recovery Manager.