Getty Images/iStockphoto
Step-by-step guide on how to create an IAM user in AWS
Learn how to make an AWS IAM user and assign an access policy to the user with a few commands. This detailed tutorial includes screenshots to guide you through the steps.

AWS admins can rely on policies, rather than individual configurations, to set up security for accounts on the platform. They also have the benefit of programmatically creating and configuring users. This tutorial covers the basics of AWS Identity and Access Management as well as how to get started using it.
Why AWS IAM?
AWS offers Identity and Access Management (IAM) so that its customers can control who or what can see and use their services and resources. AWS admins can create users and groups and grant them access to resources through policies. Policy-based access control enables granular allow/deny decisions that come from a centralized control point.
For example, an AWS admin can grant a user full access on Amazon Simple Storage Service or Amazon Elastic Compute Cloud only. This security approach is more transparent and consistent than individually configured account access.
AWS IAM benefits cloud users because it offers:
- a centralized portal for all identities and access;
- multifactor authentication on user accounts;
- granular permissions through policies; and
- sharing with the option of limited access for others.
AWS IAM is free to use. AWS charges for the resources that accounts consume.
Follow this tutorial to get started with AWS IAM. It starts in the AWS Management Console to create a IAM user with programmatical access. Next, it switches to the command line interface (CLI) with AWS CLI. The tutorial then walks through configuring credentials obtained from the console for the user.
Create a user from AWS Management Console
Editor's note: AWS uses the names AWS Management Console and AWS Console interchangeably.
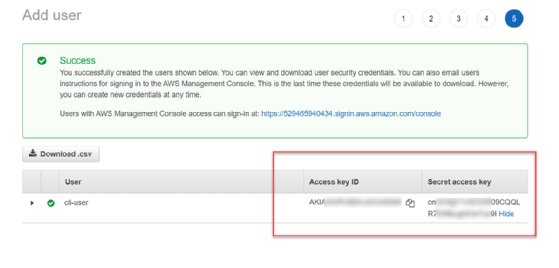
To create a user in AWS, we fill out a form and receive an access ID and secret key. At this step, we create a user named cli-user with full access permissions and programmatical access. This user is how we will manage other users later.
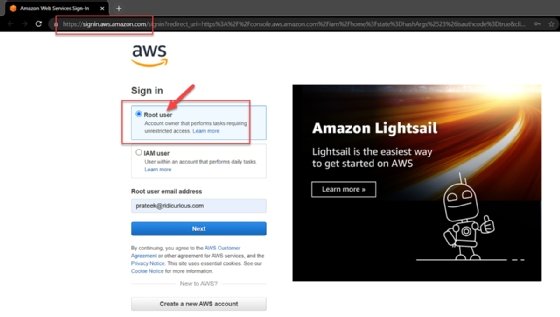
Open the IAM console of the AWS Console in a browser window.
- Sign in. Sign in as a root user. Provide username and password when prompted.
![AWS IAM console sign-in screen.]()
Figure 1. Sign into the AWS IAM console as a root user. - Select the Users menu. Navigate to the Users screen. You'll find it in the IAM dashboard, under the Identity and Access Management (IAM) drop-down menu on the left side of the screen. Click on Users.
![AWS IAM console dashboard showing the drop-down menu and Users selected.]()
Figure 2. Locate the Users button from the drop-down menu. - Add a user. Click on Add User to navigate to a user detail form. Provide all details, such as the username and access type. In this tutorial, we use the name cli-user, and check the Programmatic access box under Access type. This option gives the user access to AWS development tools, such as the command line interface used later in this tutorial. Click on Next: Permissions to continue.
![The Add user screen of the AWS IAM console, showing username and access type fields.]()
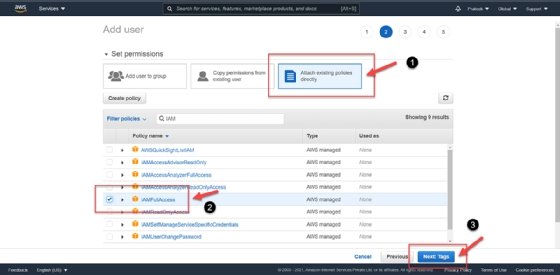
Figure 3. Create a user with programmatic access to AWS development tools. - Set the user permissions. Click Attach existing policies directly and then filter the policies by keyword: IAM. For this user, select IAMFullAccess from the list of available policies.


The IAMFullAccess policy enables this user to create and manage user permissions in AWS. Later in the tutorial, this user will perform AWS IAM operations.
- Finish the user setup. For this tutorial, we will skip the tags section of user creation and go to the review page. Check the details of the username, AWS access type and permissions. Then, click Create user.
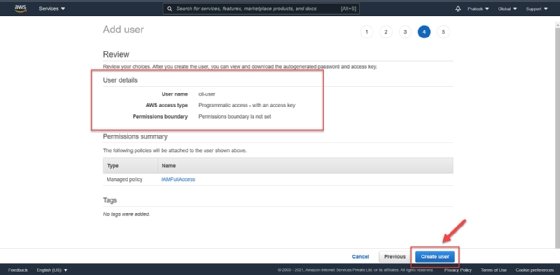
At this point in the tutorial, the user cli-user exists, with the chosen policies applied to the account. AWS provides this user an access key ID and secret access key. Download or copy these keys to a secure place to use later in this tutorial.
Set up AWS user credentials in the CLI
This tutorial uses the open source AWS CLI tool, available through the cloud provider. With minimal setup, AWS CLI enables an admin to use their favorite shell or CLI to interact with AWS services. You can choose any Linux distribution or shell. This tutorial demonstrates a Bash shell running on an Ubuntu Linux distribution.
- Install the command line tool. First, install AWS CLI on your system using the following command in Bash terminal:
sudo apt install awscli

Once the setup runs, verify the installation by checking the version:
aws –version
- Configure the user with the keys. Run the aws configure command in the shell to quickly set up the access key ID and secret access key obtained from AWS when you created the new user in the IAM console.

This step saves your credentials in a local file at path: ~/.aws/credentials and region and output format configs at path: ~/.aws/config file.
Now that cli-user with programmatic access is set up, we can use that account to create other users and give them policy-based access through AWS CLI. The next two sections walk through these steps.
Create a user and assign permissions
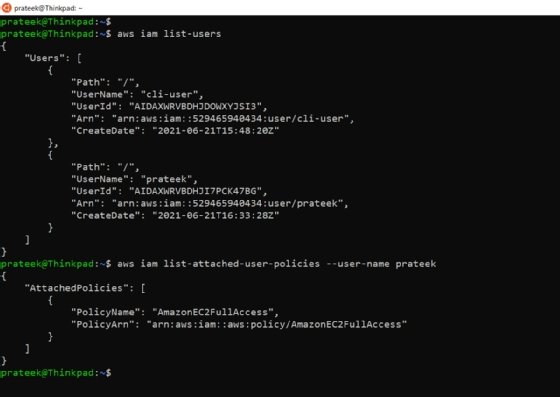
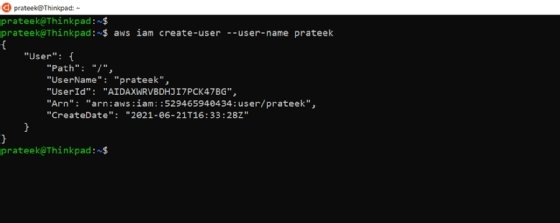
To create a user using IAM, run the aws iam create-user command in AWS CLI with a username:
aws iam create-user --user-name prateek
It creates a new user and shows the user details in the bash console.
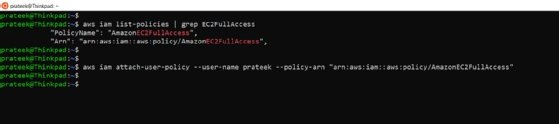
Suppose this user needs to manage EC2 services. To grant this new user EC2 admin rights, start by listing which EC2 policies we can grant. Use the command:
aws iam list-policies | grep EC2FullAccess
Identify the appropriate policy for the user's access level. In this case, it is AmazonEC2FullAccess. Pass the Amazon Resource Name (ARN) to the following command in --policy-arn parameter:
aws iam attach-user-policy --user-name prateek --policy-arn "arn:aws:iam::aws:policy/AmazonEC2FullAccess"
Check user details and list user permissions
Once you create the user and attach the appropriate user policy to them, verify that AWS assigned the appropriate policy by checking the user details.
To check the list of IAM users, run:
aws iam list-users
The following command tells AWS to list all attached policies for a user account:
aws iam list-attached-user-policies --user-name prateek